Saturday, 23 August 2014

How to Look After Your Water Tank Liner

Tank Liners are great way to extend the life of a leaking tank. Looked after properly, a tank liners will provide many years of service. To make sure you do get the maximum lifespan from a liner, there are a few maintenance procedures you should follow. Regardless of how the tank is maintained, it is recommended that the tank is inspected at least every 2 years for sludge and sediment build up at the bottom of the tank. Also check that all openings, inlets and overflows are either securely closed or that insect proof mesh is used.

image
Preventing Contamination: - As with health, prevention is the best cure. So to, if you minimise or stop contamination from entering the tank, then cleaning is easier and sludge and containments will take longer to build up.
  1. Keep roof areas clear of overhanging vegetation. This also stops roosting points for birds and access by small animals such as possums, rodents and cats.
  2. Make sure hatches are closed and use screens over inlets and overflows to prevent access by small animals and birds.
  3. Keep gutters clean and use gutter shields to stop the collection of larger material.
  4. Make sure all piping is compliant to Australian standards
  5. Do not connect to any part of the roof where containments maybe present, such as bitumen coated roofs, preservative treated woods, uncoated lead flashing etc.
  6. Do no swim inside a storage tank
  7. Prevent mosquitos breeding. Anywhere water can pool can become a breeding ground for mosquitos and other insects. Use tight fitting lids or insect proof screens on all access points, inlets and overflow areas. Both Queensland and the Northern Territory specify screens as follows:
Qld – brass, copper, aluminium or stainless steel gauze no coarser than 1 mm aperture measure.
NT – brass or bronze wire not coarser than 7 meshes to the centimetre (each way) and of 33 gauge wire.

What To Look For

Aside from regular inspections, you should regularly check the water condition. Rainwater from a water tank should be soft, clear and almost tasteless. If any of these changes, your tank needs to be inspected. There are 3 basic changes with the water to look out for:
  1. changes to the colour of the water. If it becomes discoloured it is a sign that there are containments in the water
  2. smells and foul odours are signs that algae might be growing, there is rotting vegetation or dead animals are present.
  3. Foul taste is also a sign that containments are present.
Cleaning A Tank

Over time sludge and other debris will accumulate at the bottom of a tank. How fast this occurs will depend on a number of factors. Usually the sludge at the bottom of a tank can be siphoned off without the need to empty the tank. If the debris is coarse, you may need to use a hose up to 50 mm in diameter.

In some cases you may need to drain the tank to clean it. Choose carefully what you will clean the tank with as harsh chemicals can destroy a tank liner or can contaminate the water. Also be careful not to damage the liner when cleaning, so this means don’t wear shoes and avoid using any sharp instruments that can tear or pierce the liner. For extreme cases, such as a dead animal has been in the tank, consider using a professional tank cleaning service.

If you do enter the tank, ensure that there is adequate ventilation and work with at least one other person present.

The Australian Government has a comprehensive resource guide on tank water contaminates and cleaning. https://www.health.gov.au/internet/main/publishing.nsf/Content/D3E8C00F3041304BCA257BF0001C685A/$File/env_rainwater.pdf

Friday, 22 August 2014

How to Look After Your Water Tank Liner

Tank Liners are great way to extend the life of a leaking tank. Looked after properly, a Tank Liners will provide many years of service. To make sure you do get the maximum lifespan from a liner, there are a few maintenance procedures you should follow. Regardless of how the tank is maintained, it is recommended that the tank is inspected at least every 2 years for sludge and sediment build up at the bottom of the tank. Also check that all openings, inlets and overflows are either securely closed or that insect proof mesh is used.

Preventing Contamination: - As with health, prevention is the best cure. So to, if you minimise or stop contamination from entering the tank, then cleaning is easier and sludge and containments will take longer to build up.
  1. Keep roof areas clear of overhanging vegetation. This also stops roosting points for birds and access by small animals such as possums, rodents and cats.
  2. Make sure hatches are closed and use screens over inlets and overflows to prevent access by small animals and birds.
  3. Keep gutters clean and use gutter shields to stop the collection of larger material.
  4. Make sure all piping is compliant to Australian standards
  5. Do not connect to any part of the roof where containments maybe present, such as bitumen coated roofs, preservative treated woods, uncoated lead flashing etc.
  6. Do no swim inside a storage tank
  7. Prevent mosquitos breeding. Anywhere water can pool can become a breeding ground for mosquitos and other insects. Use tight fitting lids or insect proof screens on all access points, inlets and overflow areas. Both Queensland and the Northern Territory specify screens as follows:
Qld – brass, copper, aluminium or stainless steel gauze no coarser than 1 mm aperture measure.
NT – brass or bronze wire not coarser than 7 meshes to the centimetre (each way) and of 33 gauge wire.

What To Look For:- Aside from regular inspections, you should regularly check the water condition. Rainwater from a water tank should be soft, clear and almost tasteless. If any of these changes, your tank needs to be inspected. There are 3 basic changes with the water to look out for:
  1. changes to the colour of the water. If it becomes discoloured it is a sign that there are containments in the water
  2. smells and foul odours are signs that algae might be growing, there is rotting vegetation or dead animals are present.
  3. Foul taste is also a sign that containments are present.
imageCleaning A Tank:- Over time sludge and other debris will accumulate at the bottom of a tank. How fast this occurs will depend on a number of factors. Usually the sludge at the bottom of a tank can be siphoned off without the need to empty the tank. If the debris is coarse, you may need to use a hose up to 50 mm in diameter.


In some cases you may need to drain the tank to clean it. Choose carefully what you will clean the tank with as harsh chemicals can destroy a tank liner or can contaminate the water. Also be careful not to damage the liner when cleaning, so this means don’t wear shoes and avoid using any sharp instruments that can tear or pierce the liner. For extreme cases, such as a dead animal has been in the tank, consider using a professional tank cleaning service.
If you do enter the tank, ensure that there is adequate ventilation and work with at least one other person present.

The Australian Government has a comprehensive resource guide on tank water contaminates and cleaning. 

Saturday, 16 August 2014

Uses for Dam Liners and Geomembranes


dam liner
Geomembrane – any membrane that is impermeable or very low permeable synthetic membrane liner or barrier. Used with soils, rocks or other geotechnical material in order stop the migration of fluids (or gases in some cases) from the containment area. The geomembrane is used either as a containment barrier, a lining or as capping to minimise evaporation. Dam Liners and pond liners are two very common examples, however liners have much wider uses in commercial and mining industries such as landfill sites (both as a liner and as a cap), evaporation ponds, rain water harvesting etc.

Geomembranes are typically made from flat polymer sheets, usually EPDM, PVC, Polyethylene (high and low) or Polypropylene. These are the most common materials however are other compounds and mixes are sometimes utilised.

In the case of dam liners, the use is a last resort for farm dams where other methods of sealing the dam have either failed or are not practical. Dams are typically built on clay based soil and then sealed with a clay like bentonite, sodium or gypsum. However whenever soil conditions are not ideal or where ground movement can occur, it is often necessary to consider a dam liner.
S
Farm dams, which only ever collected water for livestock and irrigation are about the only types of dams that typically don’t use a liner. All other uses require a geomembrane liner and is considered mandatory, especially for mining and commercial applications, In fact anywhere where leeching of chemicals or untreated water into the environment is unacceptable.

Geomembranes are not only used underneath but can be used over the top as a cap. Capping can prevent both rain and other elements from entering the storage area. This is used extensively in landfill applications and material selection will depend on the base liner or the cap which are under different loads and different weather conditions.

Friday, 8 August 2014

Using an online Pond Liner Calculator to work out your Pond Liner Requirements

pond liner calculator
Ponds are a great addition to a home garden and can be made in a variety of ways to suit both your tastes and the surrounding environment. Many people choose dig our own pond as this gives them a lot of flexibility in designing the shape and size of the pond. These ponds need to be sealed and a pond liner is usually the easiest and cheapest choice.


When ordering your pond liner, you obviously want to make sure you have enough! Luckily to calculate the amount required is quite simple. It is just the maximum size of the pond with the depth and edges added on. Also when installing the pond liner, it should never be stretched, so it doesn’t hurt to allow for a little extra.

For this example, lets assume our pond will end up being 3 metres long and 2 metres wide, and we want to have a maximum depth of 500 mm. We will allow an extra 300 mm along each edge. This gives us enough material to bury and conceal with rocks or paves and helps secure the pond liner in place. The edging will also prevent water from going over the top and running back in behind the pond liner. Using an online Pond Liner Calculator to work out your Pond Liner Requirements

Calculating Maximum Lengths for the Pond
To work out the total length take the pond length, add twice the maximum depth you want to have plus twice the amount of edging you want to use.

In our example of a 3m long x 2m wide pond at a maximum depth of 500 mm and with 300 mm edging the calculation becomes:

3m + 2 x 0.5m + 2 x 0.3m = 4.6m
Likewise for the width,
2m + 2 x 0.5m + 2 x 0.3m = 3.6m
pond liner calculator1
So of a 3m x 2m pond, you should order a flat sheet at least 4.6 m x 3.6 m if you want to go to a maximum depth of 0.5 metres, with about 300 mm edging all the way around.

Even better, many pond suppliers offer a pond liner calculator, such as this one from Fabric Solutions (this is where the link should be http://www.fabricsolutions.com.au/pond-liner-calculator-page/) making it a simple as plugging in the numbers.

Lastly, before you make your pond, check with local council or authorities on any restrictions or requirements before you order.

Saturday, 2 August 2014

Hayman Island Swimming Pool Renovation


Hayman_Island_final_photo
The magnificent pool that is the key feature to Hayman Island was part of a refurbishment project. The pool is equal in size to 7 Olympic sized pools, and is the largest in swimming pool in the southern hemisphere. This luxurious pool forms part of the pool wing where visitors staying in the pool rooms can have direct access to the pool.

The pool was recently part of a major renovation and rebranding effort at Hayman Island Swimming Pool, being rebranded as a “One and Only” resort.

Fabric Solutions were selected in October 2013 to undertake the complex relining of the pool with a special heavy duty scrim reinforced swimming pool liner.

Because of the immense size of the project there were many complex hurdles that needed to overcome to deliver what the resort wanted in the time line required. These included:

  1. The sheer size of the pool.
  2. The complex shape due to it being integrated with some of the resort accommodation plus a large central island.
  3. The resort is in the Whitsundays which is subtropical and subject to wet weather. Never a good proposition when all of the installation works needed to be done outside. Rain and wind can play havoc with installation.
  4. Very tight time line for completion.
  5. Working with and around other trades also involved in the renovation of the resort.

The initial step was to do a full survey of the pool to work out the shape and size of the pool liner needed. Mark Stewart of All Terrain Surveys was engaged to go to Hayman Island to do this. This was a little problematic as the pool was full as the resort was still operating at this time (closed 15th January 2014).
Hayman_Island_Pool_LayoutAround 3 days was needed to survey the entire pool, after which the data was processed using state of the art software so that the pool liner could be shaped and designed.
The liner was manufactured in 10 large sections at Fabric Solutions’ Yatala factory which is then installed and sealed on site. The liner is manufactured in order to reduce the time on site and reduce the potential for weather interruptions.

Once the pool liner sections are shipped, at the same time the first group of installers leave to meet the semi trailer at Airlie Beech to catch the dedicated barge to Hayman Island. Preparation work is the first job on the list, with some concrete work and cutting a grove into the concrete structure to fix the top of the liner into, used to create the below water seal.

The weather was not kind and most days there was some rain. On one occasion, it rained for 3 days and this put around 150,000 litres of rain water into the pool. All that can be done is to hook up the pumps and then dry off the liner and keep going. This particular storm cost the team around 5 days in lost time. I guess this goes with the territory when you are working on a project in the open.

4.5 weeks after starting, we finally had all the sections joined and secured into the sealing groove at the top. Now, it was time to fill the pool. The pool volume is around 8.5 million litres, so it was decided to fill direct form the ocean. This in itself created issues as the large pumps brought in to do the filling could only pump during high tide as the suction pipes of the pumps were high and dry during low tide. After 2.5 days of high tide only filling and the pool was full.

It was time for the project weary install crew to pack up and head back to Brisbane. Another commercial liner install project completed on time, on budget and on spec by Fabric Solutions Australia.

Saturday, 26 July 2014

Leaks in Rural and Farm Dams


dam linerDams are valuable resources on farm, being the source of water to feed livestock and provide irrigation for crops. A common misconception people have is that if a dam leaks, it probably wasn’t built properly and a cheap dam liner can be utilised to fix the problem. However it is much more complex and soil conditions determine how the dam is to be initially constructed. Ideally a dam is build on a clay based soil, any other soil to some degree will leak. The worst soils are sandy, loam based soils and shale rock soils, as these will leak the most. Dams are then made with either a clay or bentonite layer and the use of things like dam liners is uncommon as the cost is higher. Dam liners are only employed where other sealing techniques have failed, but can guarantee that no further leaking will occur.

 Aside from the soil condition, dam leakage can also occur by ground movement, erosion, incursion by tree roots and damage from livestock, just to name a few. In cases where leakage occurs, several different types of solutions can be undertaken:

- Rebuild a new dam at a different site.

- Adding a sealant to the dam, however success is low when there is still water in the dam and it is greatly increased with the dam empty. Adding a sealant to a full dam means that the application is largely uncontrolled, and thus success is not guaranteed. The treated layer will also not be compacted making it prone to being disturbed and damaged. Sealants include synthetic polymers, clays such as sodium and calcium bentonite clay and other materials like gypsum.

- Other options include the use of sodium trip polyphosphate (for certain soil conditions), bitumen and concrete .

- Completely cleaning out the dam, and re-compact the soil

- Use of a dam liner, often very expensive, but has a very high success rate and can last from 10 to 30 yrs depending on soil conditions and material choice
 Dam Liner1
When looking at a dam liner, there are a few different types of material that can be used, including:

  1. Polypropylene and Polyethylene are the most common types of liners.
  2. PVC was once a common usage for large dams, but not so any more. It is too costly and doesn’t offer a long life expectancy. It is still suitable for smaller installs though.
  3. A quality HDPE liner can provide for a long life expectancy, and
  4. EPDM and butyl based rubber liners tend to give the longest lifespans, with 30+ yrs not being uncommon.


For further information on leaking dams and possible remedies, we recommend reading the resource on leaking dams is provided by the Western Australian Government at


also see the NSW Government’s resource handbook on dams, which discusses methods of fitting the dam-liners into the eco-systems:

Friday, 18 July 2014

How To Protect Your Pond Liner


When installing or building a pond there are 3 main methods to construction. Firstly you can buy a pre-fabricated pond shell made from either fibre glass or plastic. These are a very easy and quick way to get started with a pond. However you will be limited to size and shape of what is available. Some people chose to concrete form their ponds but this can be an expensive process. Lastly many people choose to dig our their own pond and line it with a pond liner.

pond liner1

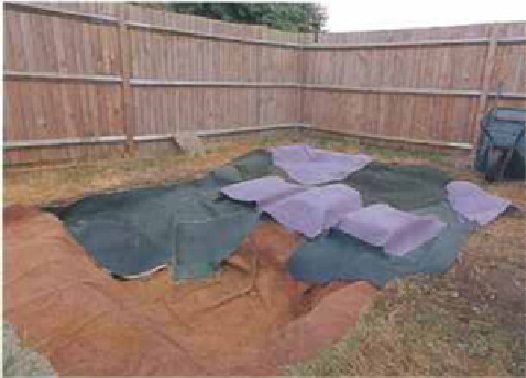
When preparing a site for a pond and before fitting a pond liner, you will need to make sure the ground is smooth as possible and there are no rocks, protruding roots or any other sharp objects. Some people lay down about 50 mm of sand to make a firm base or alternatively you can use a geotextile underlay.

A Geo textile underlay adds a protective barrier between a liner and the surface it is being installed onto. Used not only with pond liners, it is regularly used with tank liners and dam liners, helping protect the liner against sharp objects like rocks as well as from intrusion from tree roots.
pond_liner_installation -
Geotextile underlay is usually recommended as it is a better alternative to sand. It can hinder root growth into the pond liner as well as being more flexible with ground movement.
A good geotextile underlay needs to have a couple of key properties:

  1. It should be permeable, which means it lets water pass through it.
  2. It needs to be designed to be laid against soil and dirty conditions, and needs to be rot resistant.
  3. Finally in needs the ability to separate, filter, reinforce, protect or drain water that might be trapped under the pond lining.
Geotextile underlay material is also a great DIY solution, as its much easier and quicker to lay than sand. You can also install the underlay in sections, just overlapping the joins, which means you waste less by being able to utilise smaller pieces.

Typically made from mechanically bonded polypropylene needle punched material and usually comes in black, but can be bought in white or grey colours. This long lasting material is a recommended addition with making any small or large pond with a pond liner.

For More Information Visit:- Pond Liner